LENOVO YOGA TABLET 2 (WINDOWS) REVIEW

Lenovo Yoga Tablet

A good, not astounding device.


The Lenovo Yoga Tablet 2 is a unique device. Lenovo has attempted to design a tablet that can be used in a variety of capacities for both business and pleasure. How does the tablet stack up to the competition? Read on to find out.

Design and Form Factor

The design of the Yoga Tablet 2 is both its greatest strength and weakness. First, let’s talk about the positive aspects of design. The device is right in the perfect range of size and weight to be a comfortable tablet computer. The review unit we received has a 10 inch diagonal screen and weighs in at 1.39 lbs. The screen is just big enough to be productive and light enough to be comfortable for one handed use while reading books or surfing the web.

Additionally, the side with the kickstand is rounded to create a hinge for the kickstand and creates room for a larger battery. This rounded edge actually adds an extra layer of comfort during one handed use. Holding a thin tablet with one hand is typically a dangerous act. However, with the added thickness of the rounded hinge, it gives you hand more surface area to hold and a better center of gravity.

Lenovo Yoga Tablet 2 Review

The built-in Kickstand is something that sets the device apart from other tablets in both positive and negative ways. From a positive perspective, the kickstand provides a number of different ways in which the device can be positioned based on how you want to use the device. See the diagram above to see the different ways in which it can be used.

Lenovo Yoga Tablet 2

While the kickstand is relatively short in length, it is surprisingly steady when placed on a flat surface. However, that steadiness does not translate to use on your lap. Because of the short length of the kickstand when in “Stand” mode, it tends to be unstable when on your lap. I never felt fully comfortable using this on my lap like a laptop because of its instability.

Lenovo Yoga Tablet 2

Additionally, you’ll notice “Hang” mode in the above diagram. This is one of the most unique aspects of the Yoga Tablet 2’s kickstand. There is a built-in hole that enables you to hang the tablet from just about anything. Now you just need to add a new screw to your bathroom wall to enjoy your favorite television series from the bathtub. While not something that you are likely to use on a regular basis, it’s a nice added touch and I appreciate the fact that Lenovo is thinking outside of the box in innovating on their tablet.

Lenovo Yoga Tablet 2

The device can be purchased with a keyboard cover for an added cost. I’ve had a love/hate relationship with the keyboard. The keys work really well and provide the right amount of feedback to make typing feel remarkably close to a regular laptop. I actually found Lenovo’s keyboard more comfortable than the type-cover for my Surface Pro 3. While the keys are smaller, they are spaced out which prevents accidentally hitting a sister-key; a problem I constantly encounter when using my Surface Pro 3 type-cover.

Unfortunately, that’s about as far as my positive relationship with the keyboard goes. The magnet that attaches the keyboard to the tablet is not very strong. It doesn’t have that subtle snap of security that I feel when connecting the type-cover to my Surface Pro 3. Also, there are not grooves to hold it in place, so the keyboard slides left and right when moving and transporting the device. I had to be careful when holding the tablet to make sure I was gripping both pieces tightly to prevent dropping a piece due to the weakness of the magnet. The top of the keyboard surrounding the keys is a rubbery leather-like texture. Lenovo chose to make the mouse pad out of this same material which causes your fingers to stick to the touchpad a bit. Precise mouse movement and clicking isn’t impossible, but it’s not comfortable either.

The keyboard is charged using the same charger as the tablet and does not come with an extra wall-charger. While it does come with an extra cord to charge the keyboard through USB, the Yoga Tablet 2 does not have full size USB so there is no way to charge both devices simultaneously without either another computer or the purchase of another outlet-to-USB converter.

Additionally, the build quality of the tablet is in the medium range. When you pick up the tablet, it has weight to it and doesn’t feel cheap, but it doesn’t have the solidity and feel of the more premium tablet such as the iPad or Surface Pro series. This is to be expected as the device is not priced as a premium tablet being over $200 less than the base level iPad Air 2. Additionally, while the rounded edge makes it look more comfortable to hold, it does make the device lopsided. If you’re OCD when it comes to symmetrical design, like myself, this may cause a grey hair or two; but shouldn’t be a deal breaker for the majority. 


Specs and Performances

When comparing the Yoga Pro 2 with other tablets on the market, it is reasonably well powered. The hardware specs are comparable to the Apple iPad Air 2. Below are the specs for the device:

Yoga Tablet 2 Review

Compared to the iPad Air 2, the Yoga Tablet 2 is very similar in specs. Both tablets sport 2 GB of RAM. The output of the processors are also very similar. The Yoga Tablet 2 utilizes a quad-core Intel Atom processor, while the Apple iPad Air 2 uses their proprietary A8 chip that has only 3 cores. Intel’s  Quad-Core Atom processor (Yoga Tablet 2) clocks in at 1,866 MHZ while Apple’s A8 triple-core processor (iPad Air 2) clocks in at 1,500 MHZ.

On paper, the two devices should perform reasonably similar, however, it is the performance in the area of performance the the Yoga Tablet 2 falls behind. Disclaimer: One of the biggest drawbacks of the Yoga Tablet 2 is that it is running full-fledged Windows 8.1. This means that as soon as you get your hands on the tablet, you’re likely to want to do full-fledged Window’s activities. However, the device was not created for that purpose. The specs of the Yoga Tablet 2 clearly put it into the tablet category. It will perform as a severely under-powered laptop when you shift categories.

For example when running the desktop version of Google Chrome, if I have any more than 2 tabs open, the browser severely chugs. It has been a similar experience across the board for running full-fledged desktop programs, with the exception of Microsoft Office applications. (The Yoga Tablet 2 comes with a year of Office 365 for free.) However, apps that are tablet optimized and purchased through the Microsoft Store perform reasonably well. When browsing the internet ensure that you use the “Touch” version of Internet Explorer.

From a graphics perspective, the Intel HD Graphics driver scored in the bottom 10% of processors when it was benchmarked. These results were further proven during my testing while gaming. While less processor intensive games such as Sonic Dash and Asphault ran reasonably well, the visually impressive Modern Combat 5 (tablet optimized) suffered from severe framerate issues. Anytime there was any action on the screen, framerates dipped to an estimated 5-10 frames-per-second making the game virtually unplayable.

This is where Apple pulls ahead in the race. The A8 chip has some impressive 3D graphical processing capabilities that enable it to run 3D intensive games such as Modern Combat without an issue. Also, iOS is fully optimized for its tablets. As a result, the iPad Air 2 runs significantly better than the Lenogo Yoga Tablet 2 overall.

Below is the Benchmark comparison of the Yoga Tablet 2 to other comparable devices (Yoga Tablet 2 in Red):

Yoga Tablet 2 Review

The Yoga Tablet 2 performs within expectations of other devices using the same processor. While outperforming other devices in area such as Aggregate Option Pricing Performance and Aggregate Shader Performance, it misses the mark in Device Score, Drive Score, and Aggregate Memory Performance. 

The screen of the Yoga Tablet 2 outputs in full HD resolution (1080 X 1920 pixels). The colors are crisp and accurate. The backlight is sufficiently bright for almost any situation. Compared to other tablets on the market, however, the screen is of lower resolution . The iPad Air 2’s retina display outputs in 2048 X 1536 pixels. As a result, the picture is not as crisp as the iPad Air 2, but likely only noticeable to those who put high emphasis on visual performance.  

The sound and battery are the device’s saving grace from a hardware perspective. Battery life is as advertised offering an impressive 9.62 hours of Wi-Fi browsing at 40% screen brightness. Additionally, the device utilizes the Dolby Digital Plus sound driver and has speakers that offer a surprising level of clarity. While not the loudest tablet speakers on the market, they certainly get the job done, and do it well.

In summary, if you treat the Yoga Tablet 2 as a tablet, it will serve you reasonably well as a tablet. If you try to use it as a compact laptop, you will likely be disappointed. Also, the tablet is not great for 3D intensive games and applications. Where you will be impressed with the hardware is in the longevity of the battery and the clarity of the sound.


“Smash Factor”

When reviewing devices we like to look for whether a device has what we call the “Smash Factor.” This can be earned by either showing incredible innovation or overall outstanding performance. While the Lenovo Yoga Tablet 2 does a number of things right and definitely has something to offer, the device doesn’t earn the “Smash Factor” award. Feeling largely under-powered (primarily being caused by running Windows) hinders the overall experience. However, the Yoga Tablet 2 does do quite a few things right such as battery life, sound, keyboard, and ergonomic design. However, we wouldn’t consider it an off-the-charts-stellar contender. If you’re in the market for a budget tablet that can hang on your wall and perform as a tablet, this could be the device for you. Click here to access on Amazon.

What do you think of Lenovo’s Yoga Tablet 2? Tell us why you would/would not buy the device in the comments below

LENOVO YOGA TABLET 2 (ANDROID) REVIEW

Image result for Lenovo Yoga Tablet 2

A unique Android Tablet


The Lenovo Yoga Tablet 2 is a unique device. Lenovo has attempted to design a tablet that can be used in a variety of capacities for both business and pleasure. How does the tablet stack up to the competition? Read on to find out.

Foreword: We first reviewed the Windows iteration of this tablet about a month ago. One of our major complaints of the tablet was that the Windows operating system inhibited the tablet from really shining due to a poor combination of full-fledged Microsoft Windows with lower-powered tablet specs. Lenovo hooked us up with the Android model for review. The majority of this review will mirror our previous review with the exception of the Android specific aspects of the device.

Design and Form Factor

The design of the Yoga Tablet 2 is both its greatest strength and weakness. First, let’s talk about the positive aspects of design. The device is right in the perfect range of size and weight to be a comfortable tablet computer. The review unit we received has a 10 inch diagonal screen and weighs in at 1.39 lbs. The screen is just big enough to be productive and light enough to be comfortable for one-handed use while reading books or surfing the web.

Additionally, the side with the kickstand is rounded to create a hinge for the kickstand and creates room for a larger battery. This rounded edge actually adds an extra layer of comfort during one handed use. Holding a thin tablet with one hand is typically a dangerous act. However, with the added thickness of the rounded hinge, it gives you hand more surface area to hold and a better center of gravity.

The built-in Kickstand is something that sets the device apart from other tablets in both positive and negative ways. From a positive perspective, the kickstand provides a number of different ways in which the device can be positioned based on how you want to use the device. See the diagram above to see the different ways in which it can be used.

While the kickstand is relatively short in length, it is surprisingly steady when placed on a flat surface. However, that steadiness does not translate to use on your lap. Because of the short length of the kickstand when in “Stand” mode, it tends to be unstable when on your lap. I never felt fully comfortable using this on my lap like a laptop because of its instability.

Additionally, you’ll notice “Hang” mode in the above diagram. This is one of the most unique aspects of the Yoga Tablet 2’s kickstand. There is a built-in hole that enables you to hang the tablet from just about anything. Now you just need to add a new screw to your bathroom wall to enjoy your favorite television series from the bathtub. While not something that you are likely to use on a regular basis, it’s a nice added touch and I appreciate the fact that Lenovo is thinking outside of the box in innovating on their tablet.

The device can be purchased with a keyboard cover for an added cost. I’ve had a love/hate relationship with the keyboard. The keys work really well and provide the right amount of feedback to make typing feel remarkably close to a regular laptop. I actually found Lenovo’s keyboard more comfortable than the type-cover for my Surface Pro 3. While the keys are smaller, they are spaced out which prevents accidentally hitting a sister-key; a problem I constantly encounter when using my Surface Pro 3 type-cover.

Unfortunately, that’s about as far as my positive relationship with the keyboard goes. The magnet that attaches the keyboard to the tablet is not very strong. It doesn’t have that subtle snap of security that I feel when connecting the type-cover to my Surface Pro 3. Also, there are not grooves to hold it in place, so the keyboard slides left and right when moving and transporting the device. I had to be careful when holding the tablet to make sure I was gripping both pieces tightly to prevent dropping a piece due to the weakness of the magnet. The top of the keyboard surrounding the keys is a rubbery leather-like texture. Lenovo chose to make the mouse pad out of this same material which causes your fingers to stick to the touchpad a bit. Precise mouse movement and clicking isn’t impossible, but it’s not comfortable either.

The keyboard is charged using the same charger as the tablet and does not come with an extra wall-charger. While it does come with an extra cord to charge the keyboard through USB, the Yoga Tablet 2 does not have full size USB so there is no way to charge both devices simultaneously without either another computer or the purchase of another outlet-to-USB converter.

Additionally, the build quality of the tablet is in the medium range. When you pick up the tablet, it has weight to it and doesn’t feel cheap, but it doesn’t have the solidity and feel of the more premium tablet such as the iPad or Surface Pro series. This is to be expected as the device is not priced as a premium tablet being over $200 less than the base level iPad Air 2. Additionally, while the rounded edge makes it look more comfortable to hold, it does make the device lopsided. If you’re OCD when it comes to symmetrical design, like myself, this may cause a grey hair or two; but shouldn’t be a deal breaker for the majority. 

Finally, the Android version of the tablet that Lenovo sent us is their Silver model. I found this version to look much more sleek and attractive than the original black version that we tested. The silver paint gives the tablet a much more premium look and feel. If you’re going to buy this tablet, I would highly recommend going with the silver version.


Specs and Performances

When comparing the Yoga Pro 2 with other tablets on the market, it is reasonably well powered. The hardware specs are comparable to the Apple iPad Air 2 and the Nexus 9 tablet. Below are the specs for the device:

Lenovo_Specs_2

Compared to the iPad Air 2, the Yoga Tablet 2 is very similar in specs. Both tablets sport 2 GB of RAM. The output of the processors are also very similar. The Yoga Tablet 2 utilizes a quad-core Intel Atom processor, while the Apple iPad Air 2 uses their proprietary A8 chip that has only 3 cores. Intel’s  Quad-Core Atom processor (Yoga Tablet 2) clocks in at 1,866 MHZ while Apple’s A8 triple-core processor (iPad Air 2) clocks in at 1,500 MHZ.

On paper, specs can be very convincing, however, one must consider the impact of operating system efficiency on overall performance. This is where the Windows iteration of the Yoga Tablet 2 fell behind. The specs of the device simply were not sufficient to provide an optimal Windows experience. However, when you compare the Android version of the Yoga Tablet 2 to other Android tablets on the market, the Yoga Tablet 2 carries higher-end hardware.

Take a look at the AnTuTu benchmark data of the Yoga Tablet 2 compared to other smartphones and tablets on the market. It classifies the performance of the Yoga Tablet 2 as better than 99% of other devices on the market.

Yoga Tablet 2

Additionally, for anyone curious regarding the specific benchmark data, it can be seen below:

Yoga Tablet 2

The Yoga Tablet was right in the middle of the pack from a 3D gaming perspective in my benchmark testing. This was another area where the Windows iteration of the Yoga Tablet 2 fell short. I tested one of the most graphical intensive games in the Windows Store, “Modern Combat 5.” On the Windows Yoga Tablet 2, the game was barely playable, averaging in the low single digits of frames-per-second. I hypothesized that this was likely due to the game being optimized for a Windows PC with stronger hardware; not lower-powered tablet hardware.

My testing of the Android tablet has proven my hypothesis correct. Modern Combat on the Android Yoga Tablet 2 ran as smooth as a whistle. This is a testament to the power of an efficient operating system and software that is optimized for specific hardware.

The screen of the Yoga Tablet 2 outputs in full HD resolution (1080 X 1920 pixels). The colors are crisp and accurate. The backlight is sufficiently bright for almost any situation. Compared to other tablets on the market, however, the screen is of lower resolution . The iPad Air 2’s retina display outputs in 2048 X 1536 pixels. As a result, the picture is not as crisp as the iPad Air 2, but likely only noticeable to those who put high emphasis on visual performance.  

The sound and battery are the device’s saving grace from a hardware perspective. Battery life is as advertised offering an astounding 18 hours of usage and 16 days in standby. Additionally, the device utilizes the Dolby sound driver, Wolfson® Master Hi-Fi™ Codec, and stereo front-facing speakers that offer a surprising level of clarity. While not the loudest tablet speakers on the market, they certainly get the job done, and do it well.

In summary, the Android version of the Yoga Tablet 2 performs significantly better than the Windows iteration of the tablet. Our bench-marking shows that the Yoga Tablet 2 contains higher-end tablet hardware and performs better than 99% of other Android tablet devices on the market. If you’re interested in getting the Yoga Tablet 2, purchasing the Android version is a must due to being a significantly more optimized experience.


“Smash Factor”

When reviewing devices we like to look for whether a device has what we call the “Smash Factor.” This can be earned by either showing incredible innovation or overall outstanding performance. The Windows Lenovo Yoga Tablet 2 did not receive the “Smash Factor” award due to feeling largely under-powered. However,  the Android version is amongst the more powerful Android tablet contenders along with strong battery life, superior sound, a decent keyboard, and ergonomic design. While it may not be the most premium tablet you can purchase, from an overall value proposition standpoint, you can’t go wrong with the Android version of the Yoga Tablet 2; especially at $250 dollars. For this reason, we award the Android Yoga Tablet 2 with the “Smash Factor” award. If you’re in the market for a well-powered Android tablet that can hang on your wall, this is the device for you. Click here to access on Amazon.

What do you think of Lenovo’s Yoga Tablet 2? Tell us why you would/would not buy the device in the comments below.

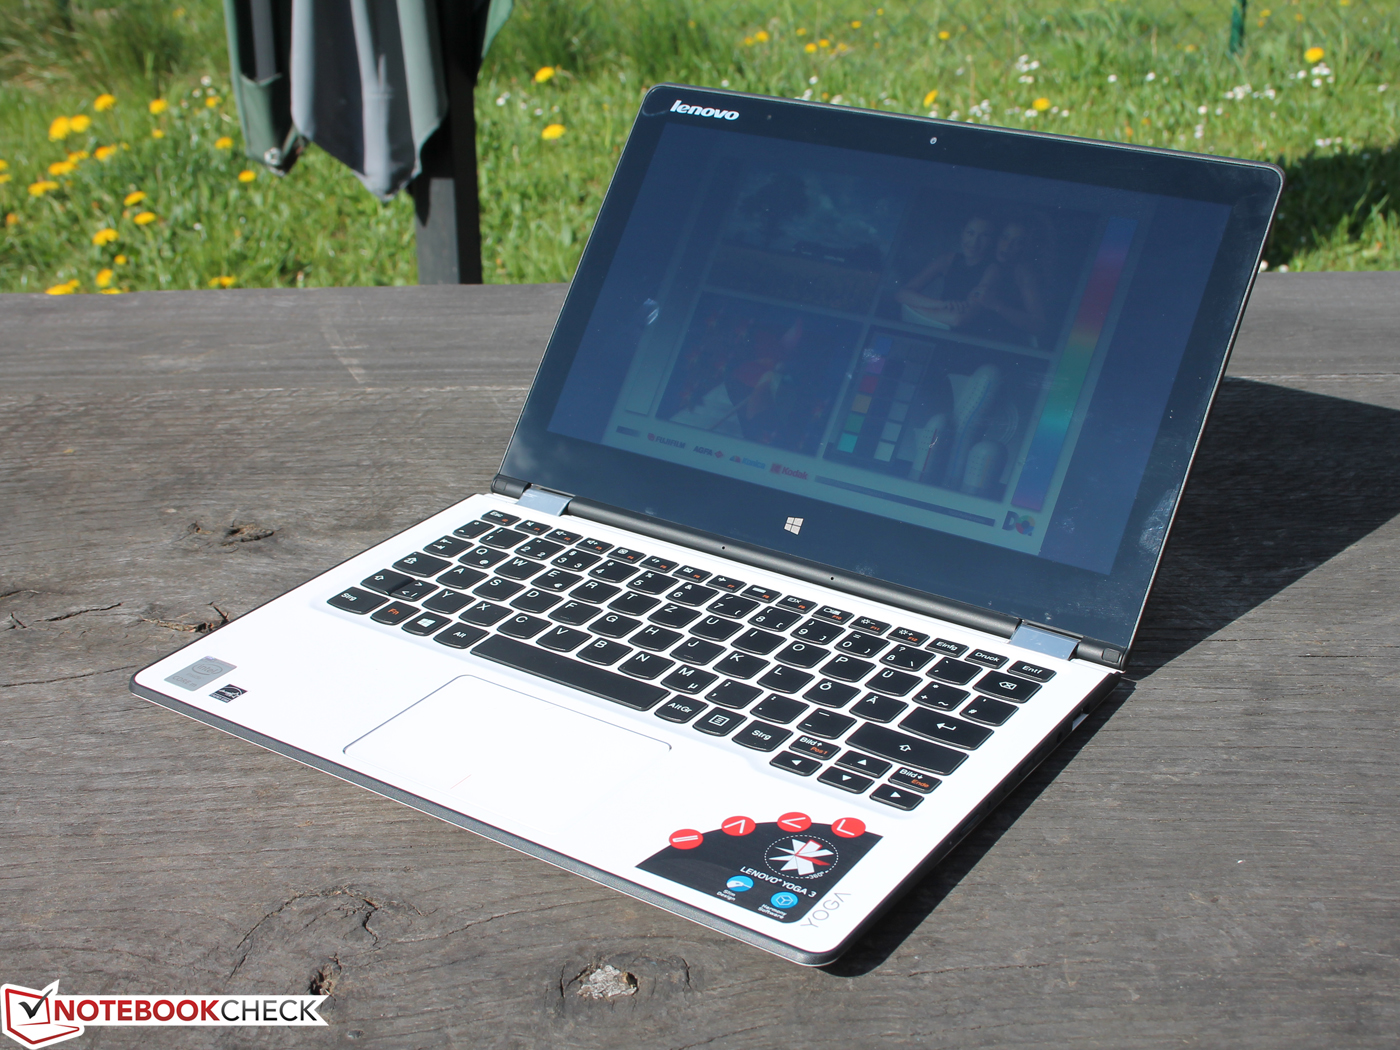
LENOVO YOGA 3 LAPTOP (11 INCH) REVIEW

Image result for LENOVO YOGA 3 LAPTOP (11 INCH) REVIEW

Lenovo’s Yoga 3 is a two-in-one laptop with a ton of potential. With a form factor to please both tablet and laptop enthusiasts, 8 gigs of ram and a Core M processsor for power, all encased in a shiny package; you would think so. But does the laptop-tablet combo actually live up to its hype? Read on to find out.

Design and Form Factor

First, lets talk about its design. Before we get into discussing its most prominent feature, the hinge, I want to discuss the sheer quality and build of the laptop. The Yoga 3’s chassis feels strong and firm. If you’ve ever used one of Lenovo’s corporate grade Thinkpad laptops, you’ll be intimately familiar with the material that the Yoga 3 is made out of. The hard plastic and signature rubbery texture feels premium. It also feels very durable. All of the plastic is firm to the touch. There is none of that flimsy plastic on the back side of the screen that makes many laptops screens seem vulnerable. The premium build is a little bit on the heavier side which doesn’t bode as well while holding the laptop in tablet mode. You will definitely want to prop it on the arm of your couch or on your knee while using it as a tablet.

Onto the meat and potatoes! Let’s talk a little bit about the infamous “hinge.” Lenovo introduced the 360 degree hinge back in 2012. Being able to fold the keyboard back and away made this one of the first two-in-ones of its kind. The design hasn’t changed much since its inception and still has some great advantages, but with various tradeoffs.

Some of the most obvious benefits of the 360 degree folding hinge is the ability to turn the laptop into a tablet of sorts. Holding and using a laptop with one hand while standing is nearly impossible.  However with the Yoga 3’s ability to turn it into a tablet, you can simply tuck away the keyboard and hold it in one hand while tapping on the screen with the other.

Yoga 3

Additionally, the 360 degree hinge provides sufficient tension that you can put the screen to any angle. “Tent Mode”, as Lenovo coins it, is where you fold the keyboard back far enough to make it a kickstand. This is extremely convenient when doing things like watching movies or even sitting at a table while eating a bowl of cereal and checking your social feeds. Being able to prop it up at any angle makes using it as a tablet infinitely more comfortable. Lastly, you can also place the keyboard flat against the table and adjust the angle of the screen in tablet mode as well. It’s a very similar experience to tent mode except it lays flat which may be advantageous in certain scenarios.

This hinge brings a number of the benefits of being a tablet to the laptop, but it’s not perfect. I’m still not sure how I feel about holding it as a tablet while feeling the clicking of the keys on the back. While the system is smart enough to disable the keyboard while in that mode, there is something unsettling about supporting the tablet with your hands on the keys. I worry I’m going to pop the keys out of the keyboard if I hold it too tightly.

Yoga 3

Second, laying the keyboard face-down on anything is terrifying. You might as well just go get a bottle of honey and start pouring it on your keys if you plan on setting it on your kitchen table. (Alright, you might keep your kitchen table cleaner than mine, but still!) Tent mode is an infinitely less terrifying alternative that is just as good in my opinion. Just say “no” to laying your keyboard face down on your table. (pictured left)

Screen and Inputs

The screen is one of the areas in which the Lenovo Yoga 3 really shines. It has a full HD multi-touch screen. The colors are vibrant, the touchscreen is responsive, and the 11 inch size is one of the best happy-mediums balancing size and portability. While it is not the highest resolution laptop screen on the market, by any means, at 11 inches you really don’t need a higher resolution screen than full-HD in my opinion. 

Additionally, the keyboard and mousepad both performed exceptionally well. Many of the compact laptops and two-in-ones skimp on a quality keyboard, but you’re definitely getting a solid typing experience on the Yoga 3. The touch pad is equally responsive with its satisfying mouse clicks.

The Yoga 3 also comes with quite a few more ports than your average two in one. (I secretly covet all the USB ports on this laptop and hope the Surface Pro 4 follows suit.) You’ve got three USB ports: two USB 2.0 ports and one USB 3.0 port. It also has a Micro HDMI out and an SD card slot. It’s worth noting that one of the USB 2.0 slots doubles as the power input so it won’t be available while plugged it, but it’s nice that it’s available when running on battery.

Sound and Speakers

The laptop has stereo speakers that are interestingly enough on the bottom of the laptop. Lenovo boasts immersive audio using Waves MaxxAudio so that everything sounds good regardless of the way in which you’re using your Yoga 3. I found this to be mostly true. Despite the speakers being face down on the desk when in regular laptop mode, this is actually the position that I found sounded the best. If you’re holding it in tablet mode, the speakers are blocked by the screen and you’ll notice a bit of muffling.

The sound quality is actually surprisingly good. While I wish they would go just a tad bit louder, the speakers boast strong and crisp bass for laptop speakers. I was delightfully surprised to say the least.

Specs and Performance

The review unit that Lenovo provided us came with Intel’s Core M Processor, 8 Gigabytes of DDR3 RAM, and a 256 GB SSD. While on paper, the specs seem decent, the performance of the laptop leaves much to be desired and ultimately hinders the entire experience.

I found performance to be somewhat inconsistent. When I first received the laptop, it seemed pretty zippy. The start menu was responsive and apps opened within an acceptable amount of time. However, as I started using Windows programs such as Chrome and Internet Explorer, I was quite disappointed by its performance. In fact, I sent the original unit back to Lenovo thinking it was defective just to be replaced by an equally sluggish second review unit.

The dual-core Core M processor is supposed to be energy-efficient while still packing a punch. Unfortunately, I found neither to be true. Webpages with high-resolution images stuttered heavily while trying to scroll. Even having more than 1 tab open in Chrome was too much for the processor to handle smoothly. For example, with a single tab open on Amazon.com, when typing my search, you could see the text was about .25 seconds behind. I even tried to run one of the 3D games optimized for Windows tablets (Modern Combat 4) and it ran at maybe 10 frames per second making it virtually unplayable.

Other non-3D tablet optimized apps such as Facebook seemed to run just fine. I tested both Hulu Plus and Facebook apps and they ran as expected. It seems it’s primarily Windows programs that are not optimized for tablet level processors that the Core M processor struggled with most.

The benchmarking stats below that the Core M processor did not score well amidst other processors on the market. You can see how far the Core M lags behind its Core i5 counterpart in the benchmark screenshot below.

Lenovo Yoga 3

You would think that battery life would be the saving grace of the Core M processor, but that’s unfortunately not the case. While battery life is on par with competition when actively running, what I found disappointing was battery life while in stand-by mode. Many times I charged up the Yoga 3 and put it in stand-by mode just to pull it out a couple of days later completely dead. Something in their stand-by algorithm needs some adjusting. Hopefully this will be fixed in a future software update.

Overall

Overall, there are a ton of aspects that I love about Lenovo’s Yoga 3 laptop, however, its performance is overly hindered to the point that I simply can’t recommend the 11 inch Yoga 3. While I haven’t yet had any hands on time with it, the 13 inch Yoga 3 comes with a Core i5 processor which would likely be more than worth the extra few hundred dollars for the performance gains. Unless you only plan to use the laptop for Netflix and Facebook, I would avoid the Yoga 3 11 inch model. 

LENOVO FLEX 3 (15 INCH) REVIEW

20150801_200657

Lenovo has come a long way with the design of their laptops, and the Lenovo Flex 3’s design does not disappoint. Although the laptop is sleek and stylish, does the overall size get in the way? Read on to find out. 

Design and Form Factor

Lenovo
20150801_201456

Lenovo’s Flex 3 has a great design, and quite frankly, it surprised me when I took it out of the box. Having used Lenovo’s enterprise grade laptops for work for years, I did not have high expectations when it came to the overall design of the Lenovo Flex 3. My previous experience has been that Lenovo focuses on functionality above style. The Flex 3 is all black with silver hinges. The body is made of plastic, but the plastic feels strong and sturdy. I have owned laptops in the past where I felt any weight on top would cause damage to the screen, but this is not the case with the Lenovo Flex 3. Additionally, the keyboard is made of a metallic material rather than plastic that gives it an extra flair.

Lenovo’s recent claim to fame has been their “hinge” which allows you to rotate the screen 360 degrees. This allows the users to utilize the Flex 3 as a laptop, tablet, and anything between. The Flex 3 has four “modes”: laptop, tent, stand, and tablet. After using the Flex for about a month, I found myself only use the laptop and tent mode. I found the flex difficult to use as a tablet, simply due to its large screen size. At 15 inches the laptop was difficult to hold with one hand, which made typing on the screen nearly impossible to do. The times that I did need to type I had to place the Flex 3 on my lap or table. Yes, the idea of having a 15-inch tablet is cool but when it came down to it, 15 inches are not practical for tablet applications. 

I also found that I never used the Flex 3 in stand mode. I figured the purpose of this mode was to better hear the sound as the speakers are located directly under the screen on the keyboard. When the Flex 3 is in stand mode the speakers are facing directly 

20150801_201024

at you which provides a better listening experience. When it came down to it, I was worried to rest the laptop on the keys of the keyboard that could potentially damage the keys. Although you might lose sound quality, it was much less stressful using the Flex 3 in Tent mode.

Some of you may be asking yourself, “what if you hit a key while in a mode other than laptop mode?” No need to worry, the Flex 3 can sense what mode it is in and will disable the keyboard in all modes except laptop mode. After a little testing, I found that the laptop is disabled once you break the 90 degree mark. If you ever need to use the keyboard, simply touching the small keyboard icon on the taskbar will allow you to type whatever is needed in all four modes.

I am what some may consider a typing snob. Many 2-in-1 laptops do not provide a good typing/mousepad experience. For example, I can’t stand typing on the Microsoft Surface Pro, but the Lenovo Flex 3 provides a great typing experience and has a very responsive mousepad with a solid click. However, if you are new to the mouse-pads that provide a single pad that you use for all of your gestures, there might be a bit of a learning curve.

Screen and Inputs

The Lenovo Flex 3 comes in 11, 14, and 15-inch models, all of which have a 1920 x 1080 anti-glare multi-touch screen. I watched a number of movies on the Flex 3 and was impressed with its image quality and overall screen brightness. Colors are vivid and bright, and the built-in Intel HD graphics card more than suffice. Although the laptop does not have the highest resolution screen available, I was never disappointed.


What the Lenovo Flex 3 is not lacking is the variety and amount of inputs it has. The Flex 3 comes with 2 USB 3.0, 2. USB 2.0, HDMI-out, Ethernet, Audio, and a 4-in-1 card reader port. The 4-1 card reader supports Multimedia Card, Memory Stick, Secure Digital, and xD-Picture Card. Since Lenovo is trying to keep the Flex 3 to 1 inch thick, they had to do without the DVD/CD drive. While I thought this would be difficult to overcome, I have quickly realized that it is really not needed. Unless you like you own DVD’s or listen to your music on a CD, you don’t need to worry about not having a DVD/CD drive.

Sound and Speakers

I was most impressed with the sound and speakers of the Lenovo Flex 3. The Flex 3 has 1.5W stereo Speakers with Dolby Home Theater certification. The speaker is located directly under the multi-touch display that faces towards the back of the keypad. The speakers provide a crisp and clear listening experience.

When watching different movies and listening to some songs, I was surprised by the sound level the speakers were able to produce. I decided to take the speakers to max volume and came to the conclusion that I would probably never have a reason to max out the volume on the speakers.

Specs and Performance

The review unit that was provided to us came with a Intel Core i5-5200 processor, 8 GB of DDR3 RAM, and a surprising 1 TB Solid State Drive (SSD). Outside of the 1 TB SSD, the specs of the Lenovo Flex 3 are up to par with what you would find with any mid-tier laptop.

After using the PC for a month, I never felt the urge to throw it against the wall due to performance. With that said, I used the Lenovo Flex 3 as most day to day consumers would. I browsed the internet, watched movies through Netflix, Hulu, and Amazon Prime, and even wrote a few articles with it. No matter what task I was trying to perform I did not have a problem when it came to processing speed.

I did try to load a large excel file that took about 2 minutes to load, but only 45 seconds with my high-end personal laptop supporting an i7 processor. However, when loading new blank documents the document opened relatively quickly (under 10 seconds).

After running a benchmark test, I was surprised by the results. The Intel Core i5-5200 processor did not perform as well as some other processors on the market.

Bench

Intel’s i5 processor is more than enough processing power for the everyday consumer. When you add 8GB of RAM and a 1 TB SSD many will be more than satisfied with the power that the Lenovo Flex 3 provides. If you are looking to have a little more processing power, Lenovo provides a number of upgrades that you can incorporate into the Lenovo Flex 3.


Overall

After using the Lenovo Flex 3 for about a month, I would recommend this laptop to those that are looking for an everyday computer. If you are looking to perform heavy process tasks such as video editing, processing large amounts of data, or even playing intense video games, I would suggest looking at higher end laptops on the market. When you add the functionality that the Flex 3 provides, there are few laptops that will be able to beat it. With that said, I would look into getting a smaller screen size if you want to take full advantage of the tablet functionality.

KURIO PHONE: THE SMARTPHONE FOR YOUR KIDS

Kurio Phone

Kids today use technology as part of their everyday life. My daughter is only 18 months old, and she already knows how to turn on my cell phone and talk to someone. While children continue to use technology, parents are trying to find the best way to keep their children safe. KD Interactive, creator of the Kurio Tablet, has now created a smartphone for kids called the Kurio Phone. This phone allows parents to feel safe, knowing they have the ability to control what their children do on their smartphone.

Like the tablet, parents have complete control of the phone. Parents control who and when their children can text and call someone else, and specify at what times of the day this can be done. When a new contact is added to the phone the child cannot access the contact until it is approved by the parent. However, parents are still unable to read texts that are sent or received on the Kurio Phone.

Kurio Phone

The GPS on the Kurio Phone can provide alerts to the parents of the location every 15, 30, or 60 minutes, and is equipped with the ability to create a geofence. By using a geofence the parents are able to set restricted areas. When the device enters one of these restricted areas an alert is sent to the parents, notifying them that the phone is in a restricted area as well as its location. These restricted areas can also be deactivated during specific days and times. If you do not want your child in a specific area at night, but it is ok for them to be in the area during the day, you can set up the geofence to only alert you after a specific time of the day. So dad’s, you can rest easy knowing you daughter will not be at that famous make out spot at any point of the day!

There are some great silent emergency features that are available on the Kurio Phone. If your child finds themselves in a dangerous situation, and they are not in a place where they can safely make a phone call, they can send an SOS message by simply pressing the power button repeatedly. This then sends the parents with the last know location of the device. A person will also be able to obtain information about the child’s allergies, blood type, and the primary contact details through an ICE (In Case of Emergency) form which is found on the phone.

Kurio Phone

In the situations where the Kurio Phone gets lost or stolen, the parents can erase data and pictures remotely and sound an alarm, as well as displaying a message on the screen. The front-facing camera can also be set to take a picture when the phone is turned on. There’s even an alert if the SIM card is replaced.

Although the phone is not yet available to purchase, Kurio expects the phone to be priced between $165 and $330. When the phone does become available, you can bet we will provide an in-depth review of all its features. Stay tuned so you can stay up to date on this child friendly phone

KEEKER: THE HAPPINESS HUB FOR YOUR HOME

Keeker

Making our homes smarter seems to be all the rage as of late. With Amazon’s recent announcement of the Amazon Echo, and the surge of home automation devices, it is clear that home automation is here to stay. (Who knew Disney would predict the future with “Smart House” so many years ago) Keeker, a current Kickstarter project developed by a former Google Product Manager, is looking to make your home even smarter

This little Android powered robot wants to join you in any room and provide you with assistance and media content to bring contentment to your life. Using a combination of sensors, a 360 degree camera, a 3D sound system, and a multi-angle projector; Keeker can follow you around and improve your life in many ways:

Want a new friend to follow you around? Keeker!

Want to lighten the mood? Keeker! 

Want to jam to some 50 Cent with your grandmother? Keeker!

 Improve upon your yoga pants sessions? Keeker!

Not to mention, Keeker will survey your home and provide real time alerts of potential intrusion. 

I’ve only covered a fraction of the ways in which Keeker could improve your life. Check out their pledge page for all the details, specs, and functionality. This device has already received funding nearly 3 times its goal. While no release date nor price was specified, the pledging bonuses lead me to believe this will cost between $2,000 and $3,000 dollars. While a bit pricey for some, this device could replace so many different devices within your home that it might just be worth the switch. 

What do you think of Keeker? Are you glad that it rhymes with speaker? Are all of its functionality and life improvement opportunities worth the value to you? Let us know in the comments below.

INVERSION GLASSES: WACKY, COOL, AND FUNCTIONAL


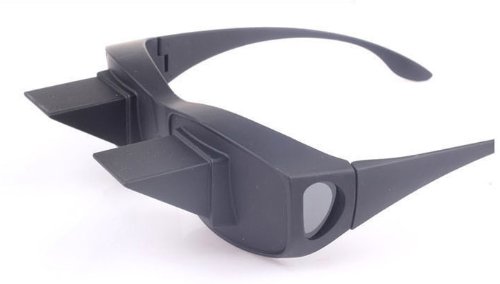
This year I was surprised by the gift that gave me the biggest “wow” factor. (Excluding the Surface Pro 3 of course) My sister gave me inversion glasses (view on Amazon) as a holiday gift. Now I’m sure you’re wondering what inversion glasses are. These glasses essentially allow you to look through mirrors and prisms to see at a 90 degree angle. Why would these be useful? Let me tell you my friend.

I’ve had friends who have wanted to purchase a projector so that they can project an image onto the ceiling to watch movies and TV in bed more comfortably. I’ve even purchased goofy looking video glasses for this reason in the past. It is always challenging to get the right angle to watch television in bed. You’re almost always guaranteed to be left uncomfortable and potentially with a kink in your neck. This is especially true if you fall asleep in that position.

Inversion glasses allow you to lay in bed at a comfortable angle and watch TV, or use your phone or anything else, at a much more comfortable angle. I’m sure your next question is going to be, “if it is using mirrors, won’t everything be backwards?” Thankfully, the answer to that question is a resounding “no.” Because it uses a combination of mirrors and prisms, your image is exactly how it would be without the glasses; i.e. not backwards.

Functionality

The next question that I can hear you screaming is: how does it look? This is what astounded me most. Looking through the glasses is crystal clear and not distorted, or weird, at all. In fact, at times I felt like my vision was more crisp while looking through the glasses. The width of the field of vision is sufficient, though not as wide as your normal vision. Additionally, the angle of the view through the glasses is perfect. When laying on the ground I was able to watch a movie perfectly on a 42 inch screen that is about 5.5 feet up on the wall in complete comfort. You may have to put a pillow under your head get to get the right angle in some cases, but remember, you’re laying on a pillow with your head back; not kinked forward. I did notice that your depth of field is impacted and tapping your phone in the right place can take some practice. After 20 minutes of use, you’ll be tapping like a pro. 

Often times looking through different types of glasses (such as 3D glasses) can cause your eyes to strain and give you headaches. I can report that after watching an entire 2 hour movie through these glasses, you don’t have to worry about eye strain while using these glasses. Overall, from a functionality standpoint, these glasses performed beyond my expectation. 

Design

Inversion Glasses

The glasses are made of a high quality combination of rubber and plastic, aside from the lenses. They are not, however, the most stylish looking glasses. In fact, they are incredibly goofy looking. You definitely would not want to wear these in public. (Just take a look at the lady in the picture to the right…) Even just using them around my family I would get looks and giggles; though everyone was interested in giving them a try due to the “weird and interesting” factor that these glasses have. 

Needless to say, these glasses are intended to be used at home primarily for watching TV, reading books, or playing on your smart phone while laying down. I have a bulged disc in my neck which makes sitting for long periods of time uncomfortable. These glasses now make watching full length movies a comfortable pleasure once again, which I haven’t truly enjoyed since my injury.

Overall

In conclusion, for the value ($6.50) I couldn’t ask for something better to improve my life. With many experts agreeing that we are all hurting our necks from looking at computer screens and down at phones all day, this provides an easy way to give your neck a break.

What do you think of the inversion glasses? Would you find them useful? Are you willing to give them a try in public? Or do you have too large of a friend list to lose? Let us know your thoughts in the comments below

IMPRESSION: HUBSAN X4 H107D

Hubsan X4 H107D

Overall, I’ve been extremely satisfied with the value proposition of the Hubsan X4 H107D…


With the large increase in the consumer FPV (First Person View) drone market, Hubsan has been hard at work to create a fully functional FPV drone that flies extremely well, fits in the palm of your hand, and allows you to see where you’re flying right from the screen on the controller.

Disclaimer: Today I’m solely going to be sharing day 1 impressions. This will eventually convert into a full review, but my experience with flying drones is relatively limited and my ability to pilot the drone is also limited. As I improve my skill level to the extent that I can fully evaluate the drone, I will update these impressions to a full-fledged review. Having said that, for comparison, the other quadcopters that I have flown include: The Syma X5CBrookestone’s Neutron Mini Quadcopter, and the Dromida Kodo.

Design and Durability

The Hubsan X4 H107D is probably my favorite design of all of the mini-quadcopters on the market. The white body, multi-colored props, and blue and red LEDs make for a beautiful looking little drone. The controller was also well designed with the LCD being front and center in between your controls which is a big improvement over the only other FPV mini-quad on the market, the Walkera Ladybird, which has the screen below the controls that is easily obstructed by the pilots hands.

Hubsan X4 H107D

The X4 is extremely durable. During one of my flights, I became disoriented and began drifting towards a house. In a panic I attempted to fly away from the house, however, I actually flew directly into the house at full throttle in expert mode. After recovering the drone, I’m happy to report almost zero visible damage aside from some dings in the props. By the way, if you touch the moving props with your finger while spinning it WILL cause damage to both your fingers and the props. I drew blood within the first 24 hours of owning the X4. Needless to say, this quad balances design, functionality, and durability into an excellent little package.

Flight, Agility, and Performance

The Hubsan X4 H107D is extremely docile. The little drone is extremely responsive to remotes inputs. At first, it can seem overly touchy (especially in Expert Mode), however, after getting used to the controls and how it responds, the ability to change directions on a dime can be the difference between a drone that has crashed-and-burned versus a close call.

The X4 controls in the same manner as the majority of other quadcopters on the market. The left stick on the controller is your throttle and yaw. The right stick controls the direction of the drone: front, back, strafe left, strafe right. If you’re coming from video games or even the simple remote control helicopters on the market, this control setup can take some getting used to. There is a definite learning curve associated with the advanced controls of a drone. Having said that, there is infinitely more control with these controls as well.

I’ve also been impressed with the range on this little quad. While the controller does not provide altitude for an exact range test, the quadcopter definitely seems to hit 100 meters with ease. In an open area, the video is also impressively clear. See the image below for example:

Hubsan X4 H107D

In comparison, the X4 H107D flight style is extremely comparable/similar to the other mini-quadcopters I have flown. Compared to the larger Syma X5C, however, the X4 is quite twitchy and more responsive comparatively; primarily due to the difference in size of the two quads. It’s also worth noting that you have full control over the sensitivity from within the options menu of the controller so that you can set it to your flying preference.

The X4 also allows you to do flips by pushing the right stick back and forth in the desired direction of the flip. This is one area where the X4 seems to fall behind the Neutron and the Dromida Kodo. Both of those quads have a button you press in tandem with a direction that carries out the flip. The Neutron and the Kodo both perform more concise flips as the movement is programmed in as opposed to relying on the input of the pilot. The lack of this programming could be seen as a benefit, however, for the more advanced pilots out there who want complete control over their stunts.

The X4 does tend to drift in one direction or another. Each flight I would typically have to calibrate the gyro and then adjust the trim to get the quadcopter to stay in a general area. It’s also worth nothing that it does not have hover nor GPS functions that other more expensive drones have; such as the DJ Phantom.

The average battery life on the X4 H107D is as advertised: around 7 minutes of flight time per battery. It takes roughly 45 minutes to recharge the battery with the included charger. The remote is definitely not battery-friendly. I went through an entire set of 4 AA batteries in my first day with the quadcopter. This is likely due to powering the large 5.5 inch LCD screen on the controller.

Camera and Video

One of the biggest advantages of the X4 H107D compared to the majority of the other mini-quadcopters on the market is the built in FPV camera. This allows you to control the drone while looking at a 5.5 inch display on the included remote. The video quality on the remote is decent and the ability to fly FPV on a drone that retails for under $140 dollars is incredible. Flying FPV is, however, quite challenging; especially for new pilots.

There are some drawbacks to the camera. First, the field of view is not the greatest. It can be challenging to see all of your surrounding as I would estimate only being able to see around an 80 to 90 degree field-of-view. A number of enthusiasts have modded the X4 with a smartphone wide angle lense to increase the field of view with great success and have seen massive improvements in their ability to fly FPV.

Another drawback to the FPV camera is that for weight and performance purposes, there is no on-board memory. This equates to all video being recorded from the transmitter. As objects and distance create distortion and fuzz, this is all captured in your recorded videos. While you can definitely have a good time recording videos, the X4 was not designed for your cinematic pleasures. You’ll need to get a drone more intentionally designed for that purpose such as the DJ Phantom Vision 2; though they do come at a premium.

The camera does not give the ability to take stills pictures either. If you want pictures, such as the one above, you will need to take screenshots of the video recording, which is less than optimal.

One last drawback is that when putting the videos onto your computer, they are in a strange format which requires running them through a converter to make them playable and editable. However, this is all outlined with resources in the manual of the device.

Overall, just having the ability to shoot video while flying FPV for under $140 is an incredible value, even with the fuzz. I’ve put together a compilation video of some of my flights below. Enjoy!

Additional Needs

As with all good things, they at times require other resources. Some things that you will want to consider upon purchase are as follows:

  • 4 Rechargeable AA Batteries. I’ve gone through an entire set in a single days worth of flying. Having rechargeable will pay for itself within the first month.
  • Additional props – especially if you’re a beginner. I had to replace my first prop within the first hour of owning the quad. It does come with 4 replacement props in box.
  • Additional batteries for the quadcopter. With a flight time of around 7 minutes, you’ll want to buy some extra batteries so that those trips to the park can be a bit more worthwhile. They are cheap. You can get a multi-battery charger, and 5 additional batteries for under $30 on Amazon.

Overall

Overall, I’ve been extremely satisfied with the value proposition of the Hubsan X4 H107D. It provides you with a very agile quadcopter, the ability to fly FPV through the camera and screen on the remote, all at an incredible value of less than $140. You can currently get the X4 on Bang Good for $138.99, but keep in mind that their shipping time is drastically longer than Amazon because it is shipping from China. I’ve seen cases of taking up to 6 weeks for the quad to arrive from Bang Good. Amazon also carries the quadcopter, but at a higher price of around $200. For the impatient, a purchase through Amazon with 2 day shipping might be a good idea.

What are your thoughts on the Hubsan X4 H107D? Do you own one? What are your likes/dislikes? Let us know in the comments below.

HANDS-ON IMPRESSIONS WITH THE XBOX ELITE CONTROLLER


During my time at E3, I was able to stop by the Microsoft booth and give the Xbox Elite Controller a try. I was impressed by the overall experience and demonstration. I think Xbox is onto something by offering a premium modifiable controller. I just hope Sony follows suit.


The first thing I noticed when putting the controller into my hands was that it has a premium (much heavier) feel to its build. The plastic body of typical console controllers can at times feel cheap. Many of the parts of this controller are made out of steel including the analog sticks and the paddles on the back. Microsoft has stated that the controller is built to last much longer than your typical controller.

In Microsoft’s video (see below) introducing the Xbox Elite controller, professional gamer Mike Cavanaugh states, “When I was competing, I would go through a controller every 3 months.” The steel analog sticks should address the issue of wear and tear that is most commonplace on the control sticks.

In my hands-on time with the Elite, I was able to disassemble quite a few of the interchangeable pieces of the controller. The Elite will come with 3 different sets of analog sticks providing different heights for different play styles. The sticks slide on and off really easily and are secured with magnets. The magnets were sufficiently strong to where I never felt that the sticks would fall off during a gameplay session.

In addition to being able to switch out the analog sticks, the paddles on the back of the controller are interchangeable. This means you can switch out the paddles to the length of your preference. It only comes with the 4 paddles, 2 short and 2 long; but you can mix and match their position how you please.

The controller was hooked up to a demo that took me through three different exercises to show the impact that an adjustable controller can make. The first demo had me utilize the Hair Trigger Lock function. Using a small switch on the back, you can adjust whether you want the full range of motion on your triggers or a 50% reduced range of motion. The interactive demo had me shooting at a ship as fast as I could until I overpowered its energy. Without the hair-trigger lock I completed it in 10.42 seconds. By enabling it, I was able to achieve it in 6.2 seconds; a drastic improvement.

The triggers were always my complaint going from PS3 to Xbox 360 when playing Call of Duty during the past generation. My semi-auto game was always negatively impacted due to having to pull the trigger as opposed to push the R1 button on the Dualshock 3 controller. 

The next demo had me test out the analog stick sensitivity adjustment feature. I was given the task to use the control sticks to skillfully abduct a man out of his bed through his house and into my UFO. With regular analog stick sensitivity, it took me one minute and 20 seconds and 37 hits into obstructions in the house. (It was brutal.) With the lowered sensitivity, I was able to abduct the man in 25 seconds with less than 10 hits into obstructions. The adjustment made an impressive difference.

IMG_1455

Finally, the last demo had me test the back paddle feature of the controller. The demo was a twin stick shooter. These types of games require constant contact with both control sticks as one controls your movement while the other aims. Having the back paddles enabled me to use other abilities without taking my thumbs off the control stick. I don’t know that I would say it was comfortable using the paddles, as my middle and ring fingers are not trained in the art of button pressing. However, its safe to say that by building muscle memory over time I believe you could gain a serious competitive advantage over your enemies with these back paddles. 

Impressively enough, by using the companion app you can map any button to the desired button of your choice. Want to throw a grenade using the X button? Sure, just remap your trigger to the X button. (However, I definitely wouldn’t recommend that configuration) The controller has an analog switch that stores two controller configurations. That way you can switch between them as quickly as the flip of a switch. You might use multiple controller configs if you share the controller with someone else. Or you might use it for different game types. Because it is a switch, you can even change configurations mid-game. This means if you go from running and gunning to driving a vehicle; you can switch to the configuration that is going to best cater to the game type you’re playing.

In my interview with the Microsoft representative, he was quick to point out that while you can modify a number of aspects of the controller, it still connects and plays like a regular Xbox controller. There is no improvement to latency and no turbo option. This was a conscious decision made to stay compliant with the majority of league rules regarding modded controllers.


Overall, I walked away impressed. If I was a more hardcore gamer, I would absolutely drop $150 dollars on the Xbox Elite based on my initial impressions alone. Hopefully Microsoft’s delivery of the product will live up to the hype they’ve created around the product. Below is Microsoft’s video explaining the new controller:

What are your thoughts on the Xbox Elite Controller? Sound off in the comments below

FOSCAM WIRELESS CAMERA REVIEW (FI8910W)

Foscam Review

Foscam (View on Amazon) has done an excellent job offering wireless cameras at an affordable cost. When considering a wireless camera that could connect to my smart phone for just over $50 dollars versus a $150 dollar baby monitor, I thought Foscam was a no-brainer. While not perfect, the Foscam nVisionFI8910W is a decent value for the cost. How does it stack up? Read on to find out.

Setup

A product is only as good as the consumer’s ability to operate it. While it is by no means rocket science, the Foscam does come with some headaches during the setup process. The device comes with an installation cd as well as a quick start guide. Setup requires that you plug the camera directly into the modem with an ethernet cable, boot up the software, identify the camera, and get it connected to your wireless network. While simple in theory, the process ended up taking significantly longer than it should. Finding the camera requires that you have DHCP enabled, properly configured MAC address filtering, and potentially temporarily disabling your firewall and anti-virus just to find the camera for the first time.

Additionally, the interface for the software during setup looks archaic, as if it was designed for Windows 3.1. It was equally non-user friendly. We’ve become so accustomed to well designed and intuitive software with Apple’s high standards, that we forget how challenging the software of yesteryear was. The setup software simply lives in the past.

Foscam Review

Welcome back to the 90’s

Finally, one of the features that I was excited about was being able to stream over the internet. After trying multiple different setups and troubleshooting the camera in a number of ways, I was unable to ever get the video stream to work over the internet, despite following every piece of instruction provided by Foscam. I have a Degree in Information Technology with an emphasis in networking. If I can’t figure this out, the majority of mainstream consumers are unlikely to figure it out either. The disclaimer I will give to that statement is that the problem may have been specific to my internet service provider or network setup. This is still one variable to consider when purchasing this camera, if you’re purchasing with the intent to use it over the internet. Setup is complicated and there is a chance that it won’t work for you.

One last challenge to point out, the Wi-Fi card within the device is extremely low power. This equates to pretty poor range when using it wirelessly. The camera was unable to connect at about 50 feet away through a couple of walls. If you’re looking to use the device in a larger home you’re likely going to need either a wireless extender or an Ethernet Over Power Adaptor.

Daily Use and Quality

Once you finally get everything setup, using the device is relatively smooth sailing from there. As long as the device is connected to your network, all you have to do is type in the IP address on your PC or open the tablet or smart phone app and click/tap the desired camera.. You can then move the camera around by either swiping the screen or pressing the on-screen buttons. There are also options to toggle the microphone and sound, as well as record the video stream.

The quality of the image is decent enough to use as a baby monitor or security camera, but it is not HD; so don’t expect to be able to zoom in on the fly on the wall. You’re getting 300 pixels, that’s nearly 1/4 of the number of pixels in an HD image. Video quality is about what you would expect from a low to medium-end webcam. Frames per second is going to vary based on your network setup. I found that when connected on a PC, video would average between 15 and 20 frames per second. While connecting to a smart phone the stream was closer to 5-10 frames per second. Take a look at the example video below to see for yourself:

As you can see, the quality is decent enough with functional frames per second. A few anomalies that I want to point out with the video stream. First, you cannot have the microphone and the speaker on at the same time. Not because it’s restricted, but because the microphone is so sensitive that it picks up the sound coming out of the speaker and creates an intense echo with a lot of feedback. So if you were planning on using this at your door to greet guests, it’s going to be challenging. The best workaround is to mute the mic on the camera while speaking through it, then unmute the mic and mute the speaker. It works, but isn’t optimal and doesn’t allow smooth conversations.

Additionally, the camera supports wireless standards: 802.11b, 802.11g, and 802.11n. It does not support the latest wireless standard 802.11ac, but most routers are backward compatible so that should not be a problem. That does, however, limit the top speed at which it can stream the video. However, being a standard definition video stream means that it doesn’t require a ton of bandwidth and should still work optimally with the omission of 802.11ac unless your network is extremely congested with devices.

For use as a security camera, the device supports both motion detection in addition to recording and archiving video. This does require that you use the interface within Internet Explorer and it requests you to install an unsigned ActiveX plug-in for it to work. Most Windows security settings won’t even allow installation without manually changing your security settings. It’s also worth noting that you can turn on the motion detection feature when using the phone or tablet app and it will notify you of motion. However, it eats away at your battery life pretty heavily. If you plan on using that phone for anything else, I wouldn’t recommend it.
Design and Build

Foscam Review

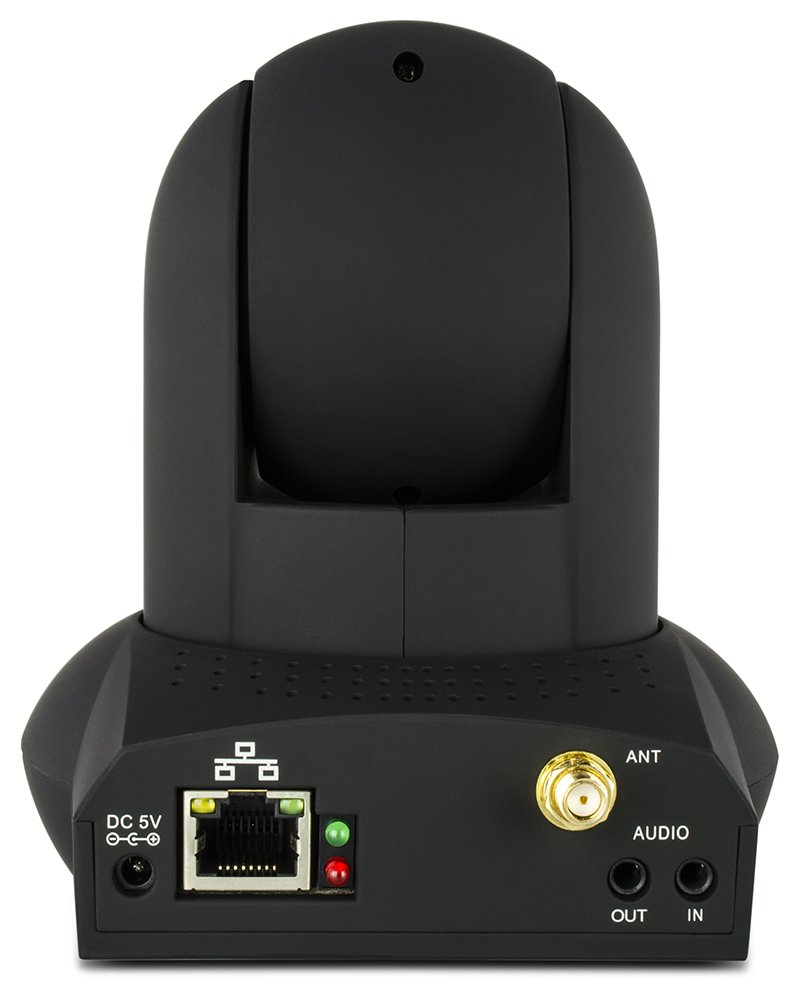
The device itself is well designed. It definitely wasn’t designed by the same person who designed the software interface. The camera lens rotates 360 degrees on the X-axis and 180 degrees on the Y-axis giving you a lot of control to look around the room your monitoring. The material the camera is made out of feels medium grade. The camera is also a bit light making it feel a bit cheaper and less durable.

The lens itself is surrounded by 12 infrared sensors that allow the camera to see in the dark. As with all infrared cameras, you lose the ability to see color while in the dark. Keep that in mind if you’re planning on using this to decipher between Pizza Hut and Little Caesars in a dark stream. (Very important)

In the box with the camera comes an antennae as well as a mount. With that mount you can permanently place the camera onto the wall. The camera also comes with the ethernet cable necessary to configure the camera the first time.

Conclusion

In conclusion, the Foscam works well enough once you get it setup. The initial setup has a few hurdles that may deter non-techie consumer, but once it is set up, the camera performs reasonably well. While not the clearest image on the market and with flaws in the speaker and microphone, the camera is imperfect, but at $50 dollars you’re getting what you paid for. If you don’t mind the initial technical hurdles, then this camera might be the bargain that you’re looking for. 

What do you think of the device? Was your experience different? Let me know in the comments below